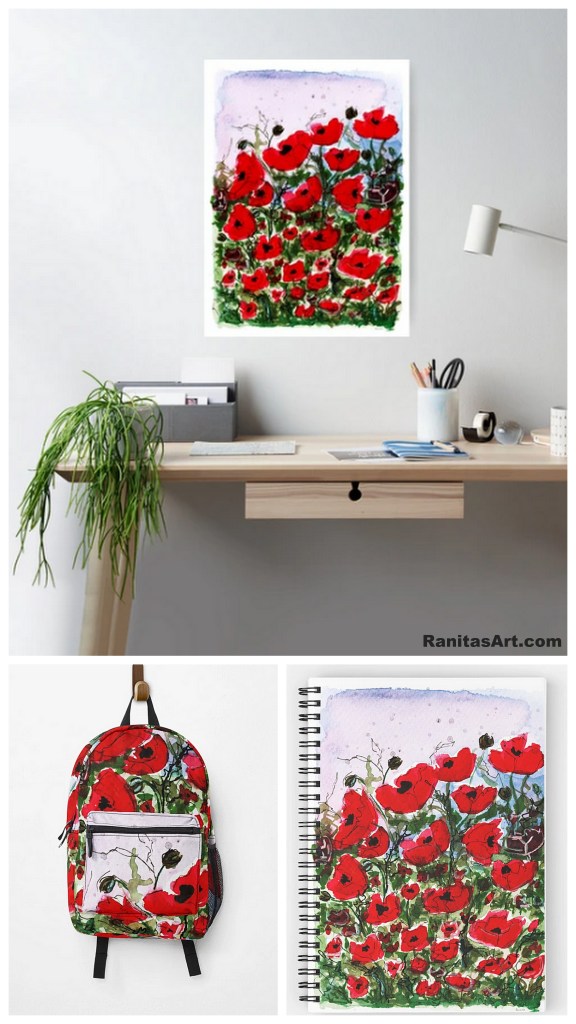
ES → En el post de hoy les quiero enseñar un video donde les muestro como pinto un campo de amapolas sin boceto previo.
EN → In today’s post I want to show you a video where I show you how I paint a field of poppies without a prior sketch.
DE → Im heutigen Beitrag möchte ich euch ein Video zeigen, in dem ich euch zeige, wie ich ohne vorherige Skizze eine Mohnblumen Wiese male.
ES → Normalmente se pinta el fondo primero, pero en este caso para poder lograr que queden manchas blancas que rodean las amapolas, pinté primero las flores , luego el fondo y por último todos los detalles de las hojas. Disfruten del video y les dejo algunos links para que puedan ver como queda el dibujo sobre algunos productos.
EN → Normally the background is painted first, but in this case in order to achieve white spots that surround the poppies, I painted the flowers first, then the background and finally all the details of the leaves. Enjoy the video and I leave you some links so you can see how the painting looks on some products.
DE → Normalerweise wird zuerst der Hintergrund gemalt, aber um in diesem Fall um weiße Flecken zu erzielen, die die Mohnblumen umgeben, habe ich zuerst die Blumen gemalt, dann den Hintergrund und zuletzt alle Details der Blätter. Genießt das Video und ich hinterlasse euch einige Links, damit Ihr sehen könnt, wie die Zeichnung auf einigen Produkten aussieht.
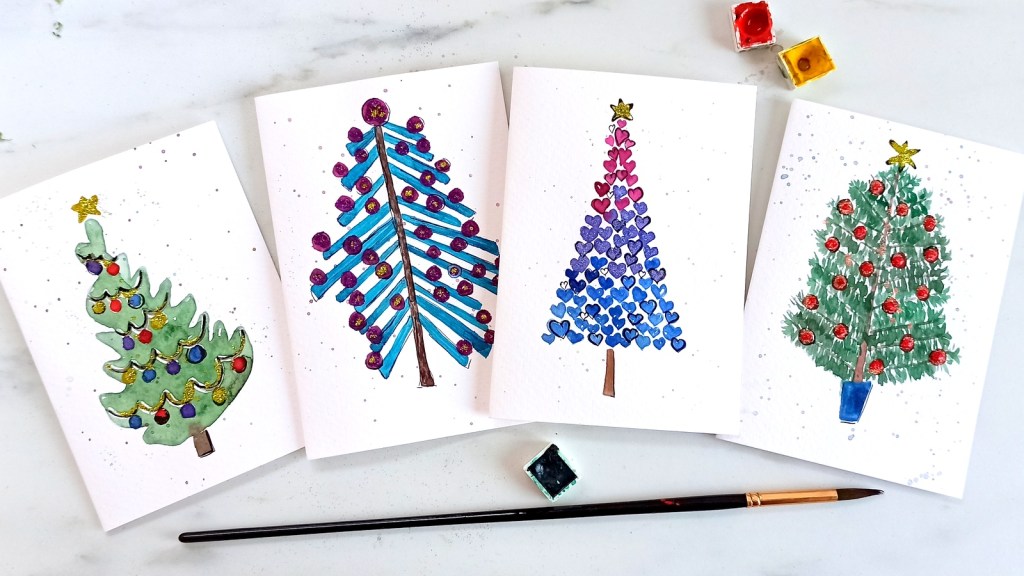
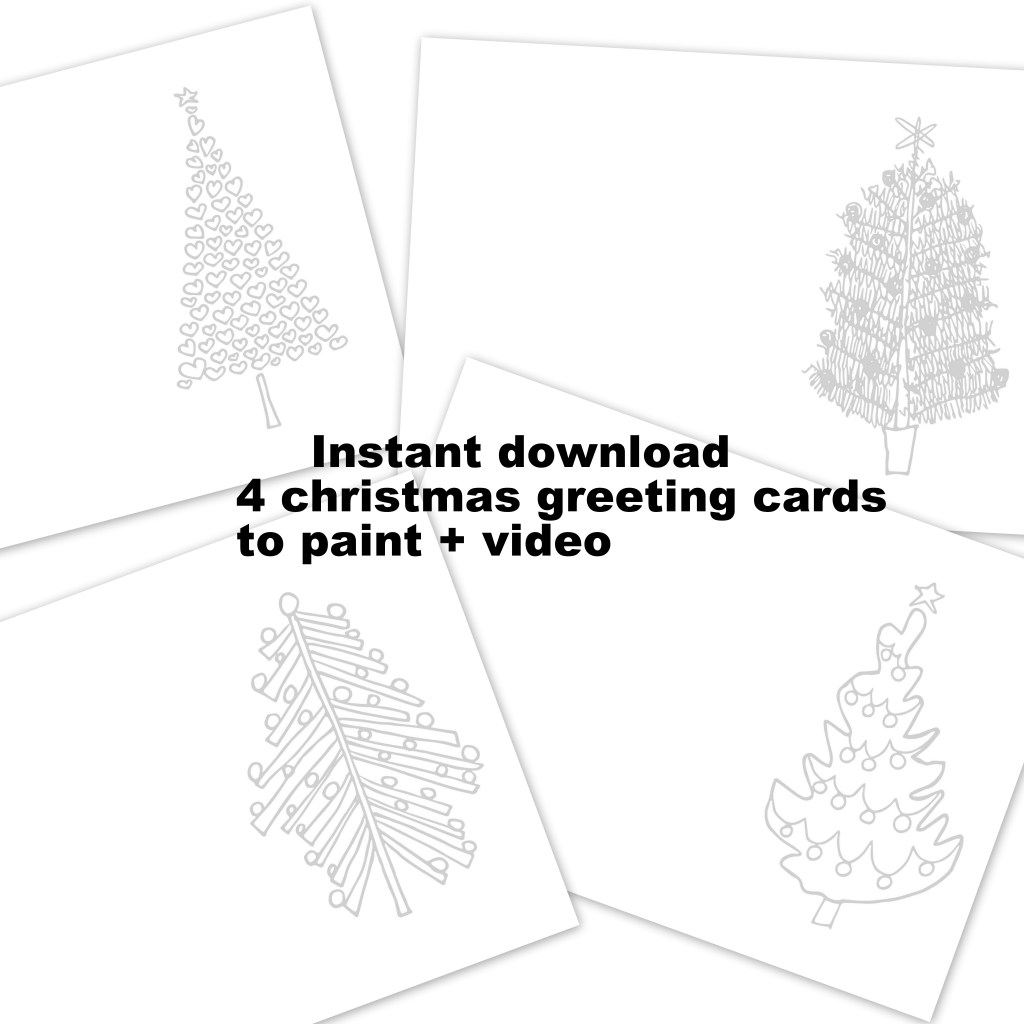
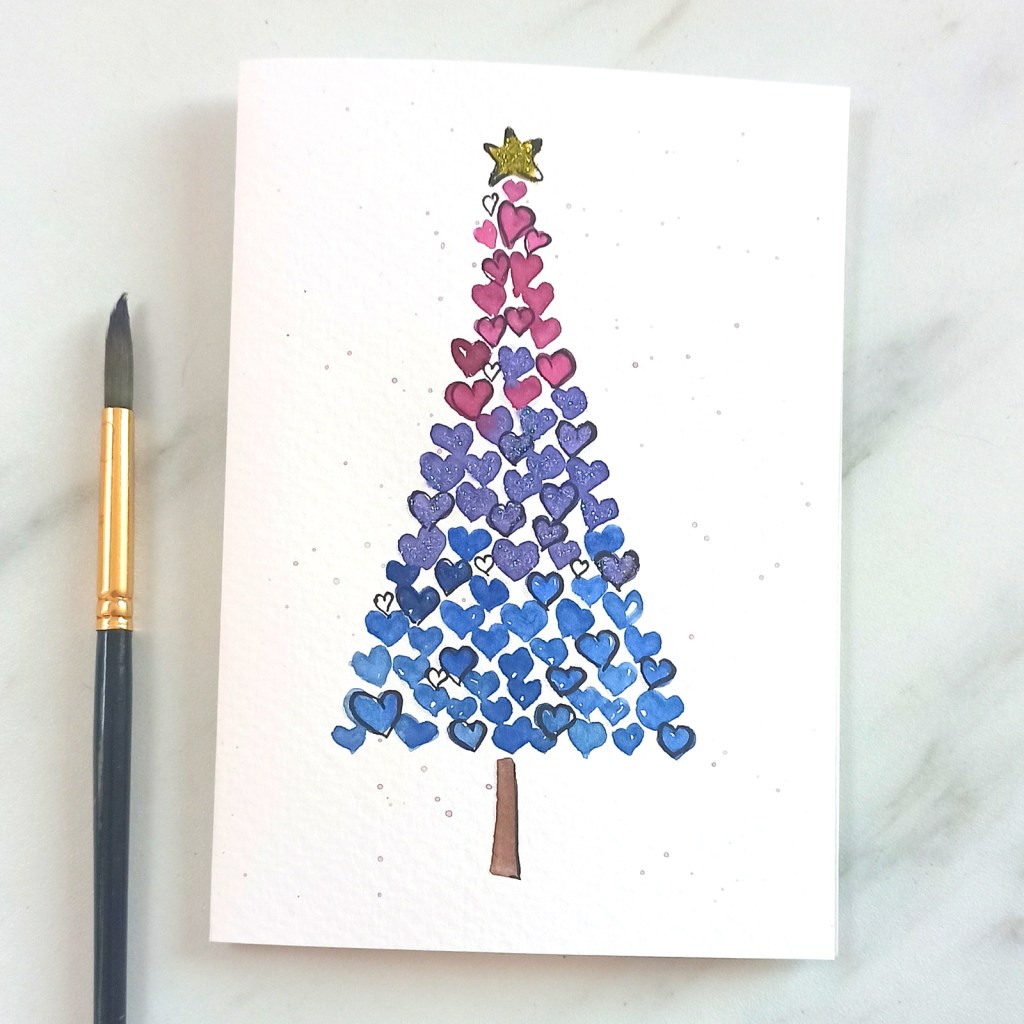
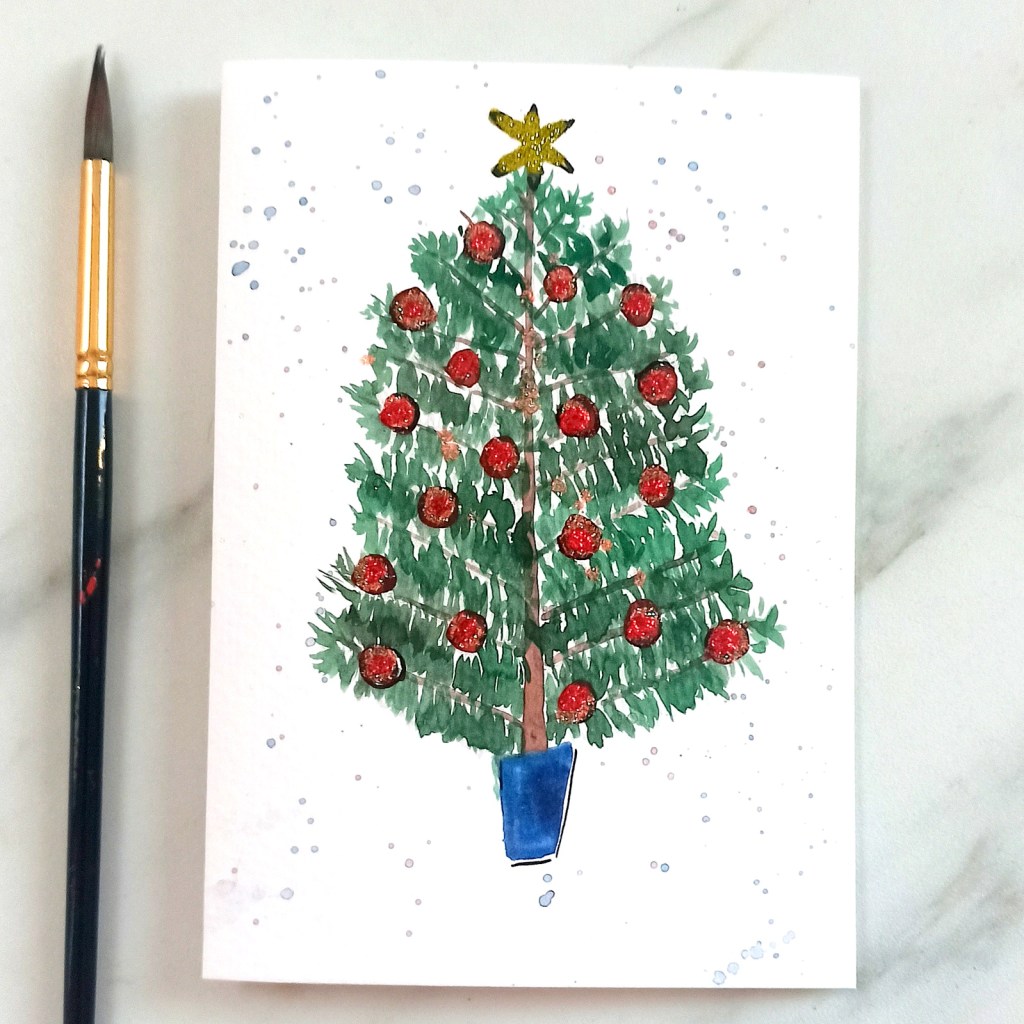
EN → In today’s post I show you a step-by-step video on how to paint 4 different Christmas trees. I prepared the sketches so that you can download them on the page and I can paint them. They are in A6 and A5 card form in a very light gray color so you can paint directly over them. Ideally, print the sketch directly on 180 gr watercolor paper. – 300 gr. . In the video I show you how to paint the 4 Christmas trees with watercolors, decorating them at the end with glitter. You can also paint them with colored pencils, in black and white with fineliner, with gouache or acrylics.
Each tree has a different technique and steps to follow. You can go forward and rewind the video to see each tree separately, since the techniques get mixed up a little, because you have to pay attention to the drying between each step. Enjoy the video and I’ll leave you some tips so you can do the job better.
ES → En el post de hoy les muestro un video paso a paso de como pintar 4 diferentes árboles navideños. Preparé los bocetos para que puedan descargarlos en la página y pueda pintarlos. Están en forma de tarjeta A6 y A5 en un color gris muy claro para que puedan pintar directamente por encima. Ideal es imprimir el boceto directamente sobre papel para acuarelas de 180 gr. a 300 gr. . El el video les muestro como pintar los 4 árboles navideños con acuarelas, decorandolos al final con brillantina. También pueden pintarlos con lápices de colores, en blanco y negro con microfibra, con gouache o acrílicos.
Cada árbol tiene una técnica y pasos diferentes a seguir. Pueden ir adelantando y retrocediendo el video para ver cada árbol por separado, ya que las técnicas se van entremezclando un poco, porque hay que prestar atención al secado entre medio de cada paso. Disfruten del video y les dejo algunos tips para que puedan realizar mejor el trabajo.
DE → Im heutigen Beitrag zeige ich euch ein Schritt-für-Schritt-Video, wie Ihr 4 verschiedene Weihnachtsbäume anmalt. Ich habe die Skizzen so vorbereitet, dass Ihr sie auf der Seite herunterladet und sie anmalen könnt, im A6- und A5-Kartenformat in einem sehr hellgrauen Farbton erhältlich, sodass Ihr sie direkt übermalen könnt. Druckt ir die Skizze idealerweise direkt auf 180 g – bis 300 g. Aquarellpapier aus . Im Video zeige ich euch, wie Ihr die 4 Weihnachtsbäume mit Wasserfarben anmalst und sie zum Schluss mit Glitzer verzierst. Ihr können sie auch mit Buntstiften, in Schwarz und Weiß mit Fineliner, mit Gouache oder Acrylfarben anmalen.
Für jeden Baum gibt es unterschiedliche Techniken und Schritte. Ihr könnt das Video vor- und zurückspulen, um jeden Baum einzeln zu sehen, da die Techniken etwas durcheinander geraten, da Ihr zwischen den einzelnen Schritten auf das Trocknen achten müsst. Genießt das Video und ich gebe euch einige Tipps, damit Ihr die Arbeit einfacher machen könnt.
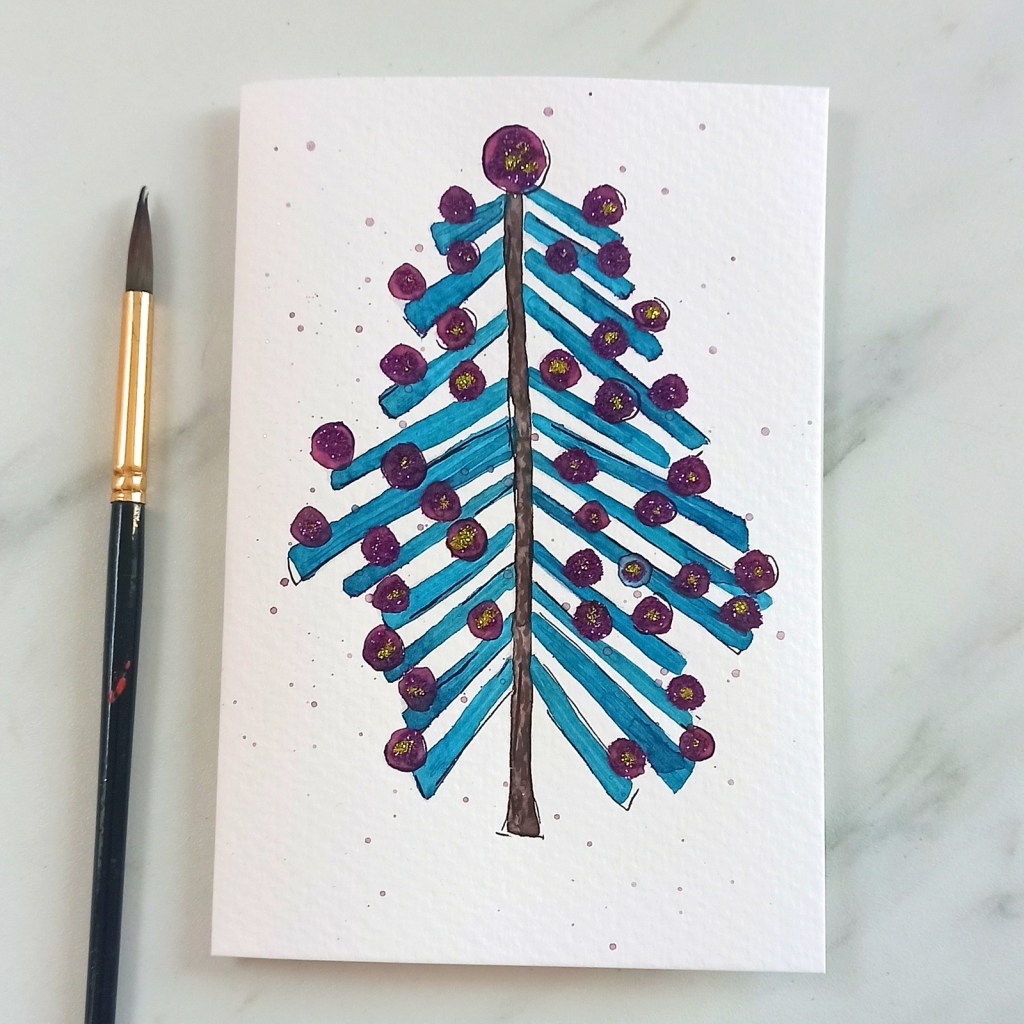
EN → Tree 1: to paint this Christmas tree we will begin to paint the branches in turquoise blue and let the trunk dry. Then we painted the balls in dark purple and let them dry again. Then we marked some details in black ink and splashed the spots with watercolor and a brush, hitting it a little so that the paint fell. Once the paint is completely dry, we will apply the glitter with glue.
ES → Árbol 1 : para pintar este árbol navideño comenzaremos a pintar las ramas en color azul turqueza y el tronco de dejamos secar. Luego pintamos las bolas en color violeta oscuro y dejamos secar nuevamente. Despué marcamos algunos detalles en tinta negra y salpicamoes mancas con acuarela aguada y un pincel, golpeandolo un poco para que caiga la pintura. Una vez que la pintura esté completamente seca, aplicaremos la brillantina con pegamento.
DE → Baum 1: Um diesen Weihnachtsbaum zu bemalen, fangen wir an, die Zweige türkisblau zu bemalen und lassen den Stamm trocknen. Anschließend werden wir die Kugeln dunkellila bemalen und wieder trocknen lassen. Dann werden wir einige Details mit schwarzer Tinte markieren und die Karte mit Wasserfarbe und einem Pinsel bespritzt, wobei wir leicht darauf klopften, damit die Farbe fällt. Sobald die Farbe vollständig getrocknet ist, tragen wir den Glitzer mit Kleber auf.
EN → Tree 2: first we will paint the balls and the garland with masking fluid and let them dry. Then we will paint the entire tree with green watercolor and let it dry. Then we will remove the masking fluid and paint the balls in different colors. We will paint the garlands and the stems brown. Next we will add details in ink and drops of watercolor wash throughout the card. Lastly we will add details with glitter and glue.
ES → Árbol 2: primeramente pintaremos con masking fluid las bolas y la girnalda y dejaremos secar. Luego pintaremos con acuarela verde todo el árbol y dejamos secar. Despuésquitaremos el masking fluid y pintaremos las bolas de diferentes colores. Las girnaldas y el tallos lo pintaremos de marrón. A continuación agregaremos detalles en tinta y gotas de acuarela aguada por toda la tarjeta. Por último agregaremos detalles con brillantina y pegamento.
DE → Baum 2: Zuerst bemalen wir die Kugeln und die Girlande mit Maskierflüssigkeit und lassen wir trocknen. Anschließend bemalen wir den gesamten Baum mit grüner Wasserfarbe und lassen ihn trocknen. Anschließend entfernen wir die Maskierungsflüssigkeit und bemalen die Kugeln in verschiedenen Farben. Wir werden die Girlanden und die Stiele braun bemalen. Als Nächstes werden wir auf der gesamten Karte Details mit Tinte und Wasserfarbentropfen hinzufügen. Zuletzt fügen wir Details mit Glitzer hinzu.
ES → Árbol 3: pintaremos el árbol de corazones en forma de degradé con 3 colores de la misma familia. Yo elegí azúl, violeta y fuxia. Una vez que los colores estén secos y hayamos pintado el tallo y la estrella, agregaremos detalles en tinta y algunos corazones extras solo en tinta. Luego con un pinsel pequeño y acuarela aguada agregaremos manchas de acuarela y dejaremos secar. Por último con pegamento pegaremos la brillantina.
EN → Tree 3: we will paint the heart tree in a gradient shape with 3 colors from the same family. I chose blue, violet and fuxia. Once the colors are dry and we have painted the stem and star, we will add ink details and some extra ink-only hearts. Then with a small pinsel and diluted watercolor we will add watercolor spots and let it dry. Finally, with glue we will stick the glitter.
DE → Baum 3: Wir werden den Herzbaum in einer Verlaufsform mit 3 Farben aus derselben Familie bemalen. Ich habe mich für Blau, Violett und Fuchsia entschieden. Sobald die Farben trocken sind und wir den Stiel und den Stern bemalt haben, fügen wir Tuschedetails und einige zusätzliche Herzen nur mit Tusche hinzu. Dann fügen wir mit einem kleinen Pinsel und verdünnter Wasserfarbe Aquarellflecken hinzu und lassen es trocknen. Zum Schluss kleben wir den Glitzer mit Kleber auf.
ES → Árbol 4 : Primero pintaremos el tallo y las ramas en marrón, además de la maceta y la estrella y dejaremos secar. Luego pintaremos las bolas en color rojo y volvemos a dejar secar. Después pintaremos las ramas verdes y nuevamente dejaremos secar. Agregaremos manchas aguadas en acuarela y por último pegaremos la brillantina.
EN → Tree 4: First we will paint the stem and branches in brown, as well as the pot and the star and let it dry. Then we will paint the balls red and let them dry again. Then we will paint the branches green and let them dry again. We will add watercolor spots and finally we will glue the glitter.
DE → Baum 4: Zuerst bemalen wir den Stamm und die Zweige in Braun, sowie den Topf und den Stern und lassen ihn trocknen. Anschließend bemalen wir die Kugeln rot und lassen sie wieder trocknen. Anschließend werden wir die Zweige grün anmalen und wieder trocknen lassen. Wir werden Aquarellflecken hinzufügen und zum Schluss den Glitzer aufkleben.
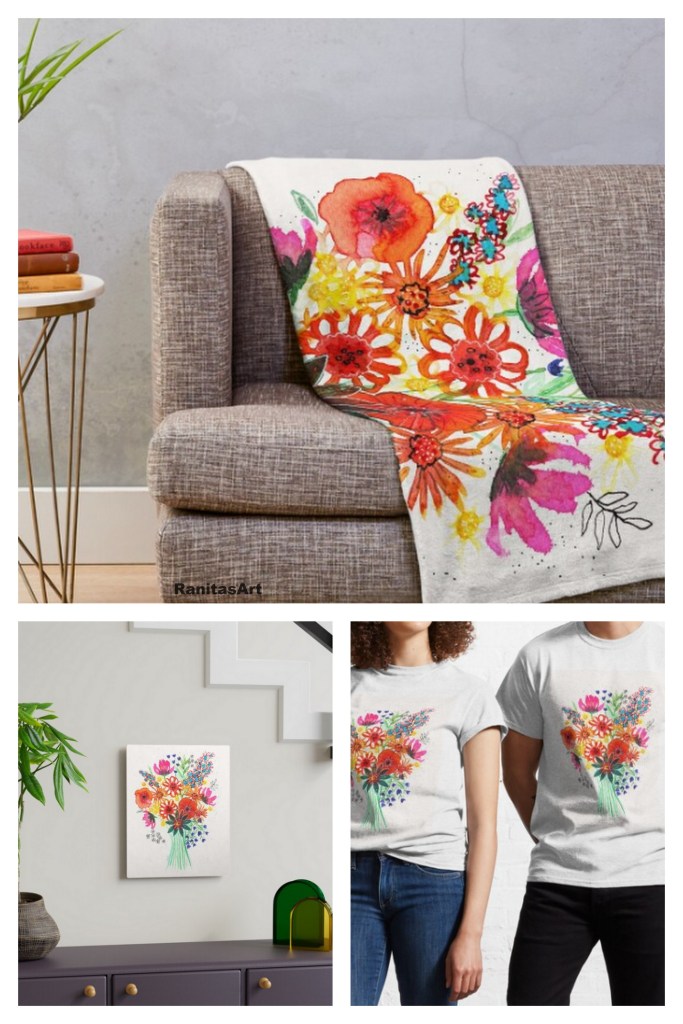
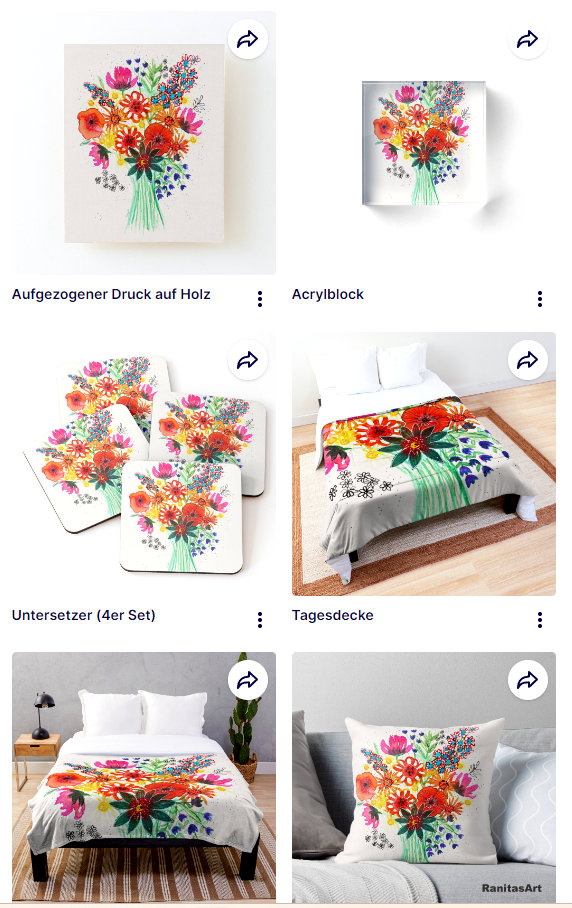
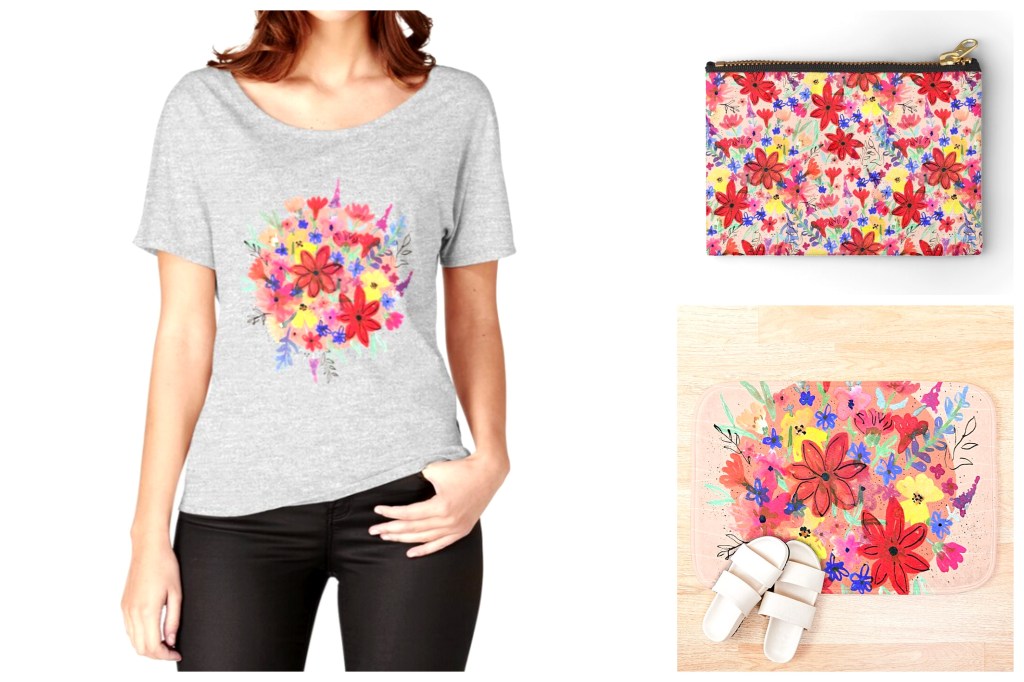
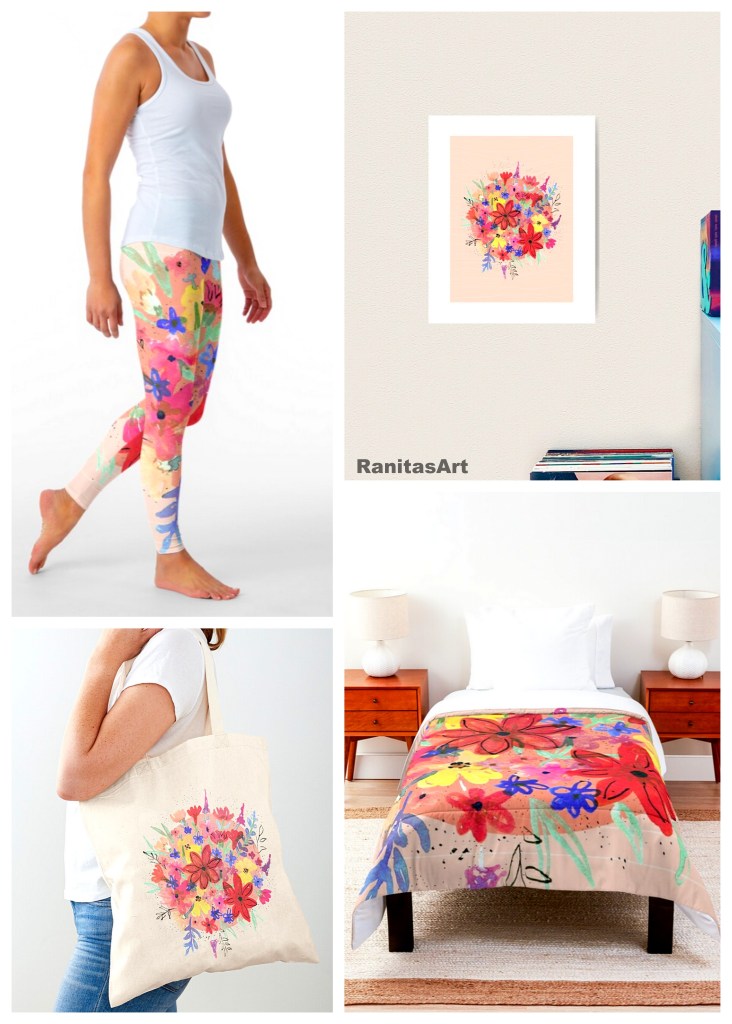
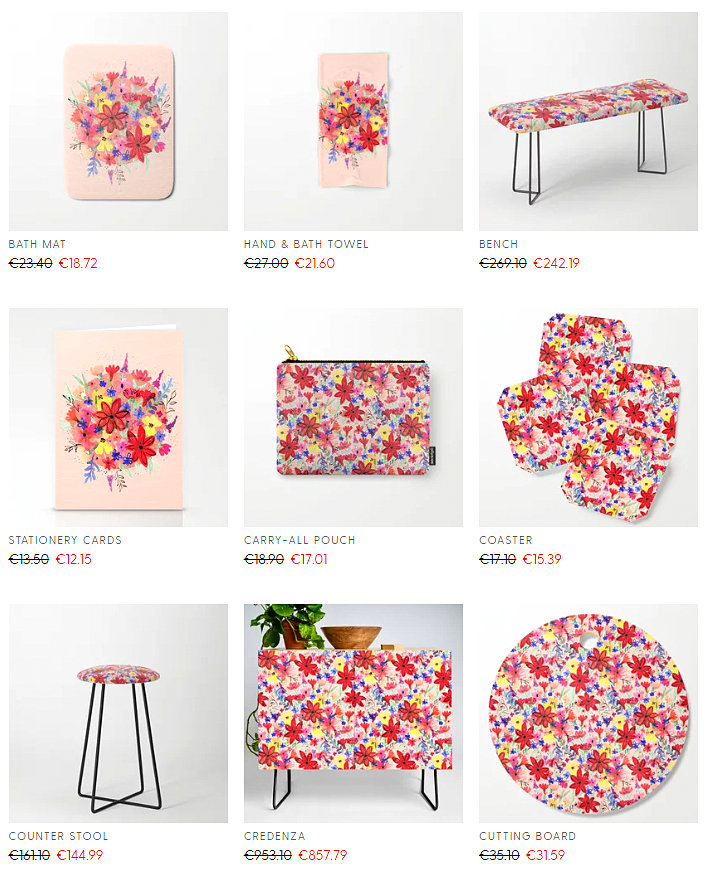
EN → In today’s post I wanted to talk to you about this video, where I show you how to paint a bouquet of flowers step by step without a previous sketch. The interesting thing about this video tutorial is that I show how to paint different types of flowers. The important thing when painting a bouquet of flowers is the balance between the flowers. There may be a central flower and the others are usually repeated 2 or 3 times. It is a video with only music and in Timelapse format. Enjoy the video ♥ !
I leave you some links, where I show you how the finished drawing looks on different surfaces.
ES → En el post de hoy quería hablarles sobre este video, donde les muestro como pintar un ramo de flores paso a paso sin boceto previo. Lo interesante de este video tutorial es que muestro como pintar diferentes tipos de flores. Lo importante cuando pintan un ramo de flores es el equilibrio entre las flores. Puede haber una flor central y las demás suelen repetirse 2 o 3 veces. Es un video con solo música y en formato Timelapse. Disfruten del video ♥ !
Les dejo algunos link, donde les muestro como queda el dibujo terminado sobre diferentes duperficies.
DE → Im heutigen Beitrag wollte ich euch über dieses Video sprechen, in dem ich euch Schritt für Schritt zeige, wie Ihr ohne vorherige Skizze einen Blumenstrauß malt. Das Interessante an diesem Video-Tutorial ist, dass ich zeige, wie man verschiedene Arten von Blumen malt. Das Wichtigste beim Malen eines Blumenstraußes ist die Balance zwischen den Blumen. Es kann eine zentrale Blüte geben und die anderen wiederholen sich normalerweise zwei- oder dreimal. Es ist ein Video nur mit Musik und im Timelapse Format. Viel Spaß mit dem Video ♥ !
Ich hinterlasse euch einige Links, in denen ich euch zeige, wie die fertige Zeichnung auf verschiedenen Oberflächen aussieht.
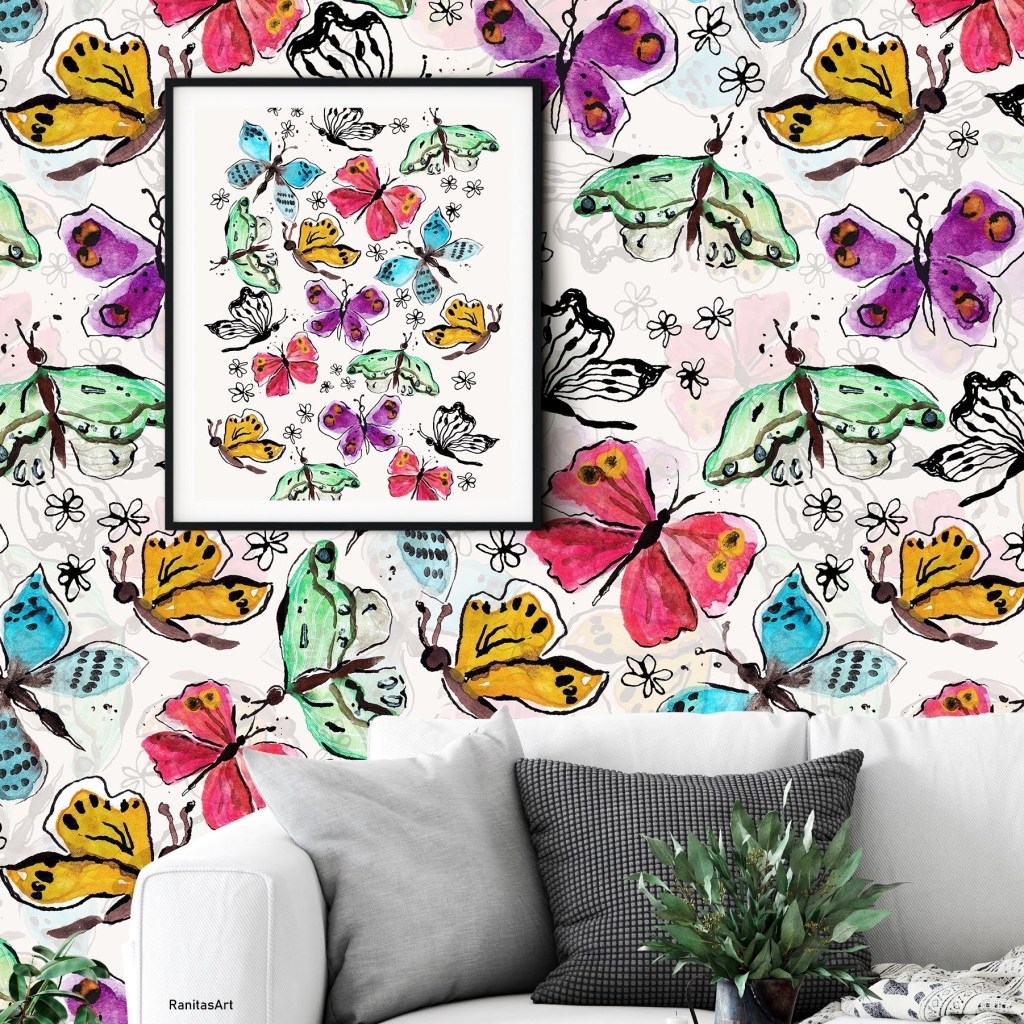
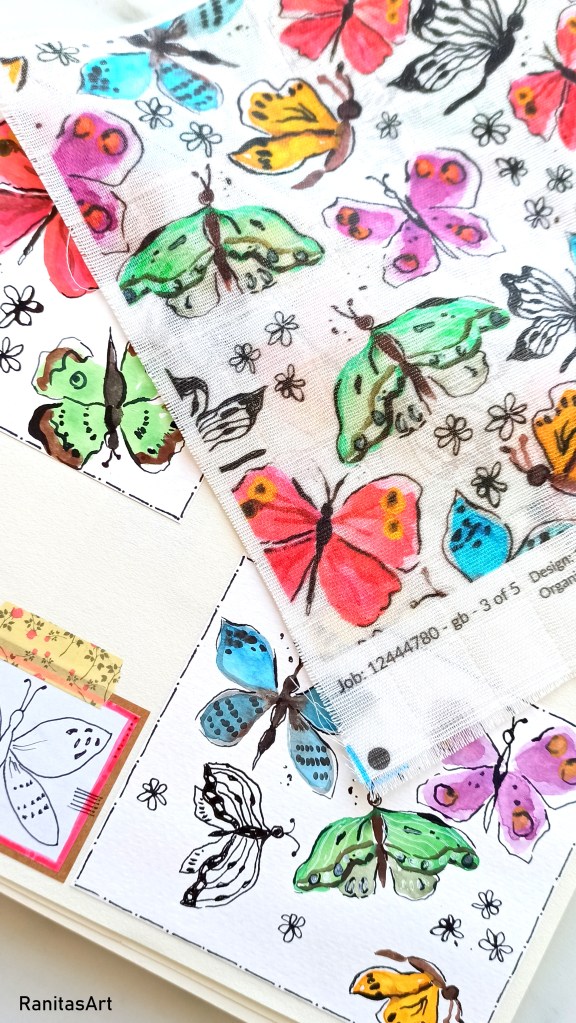
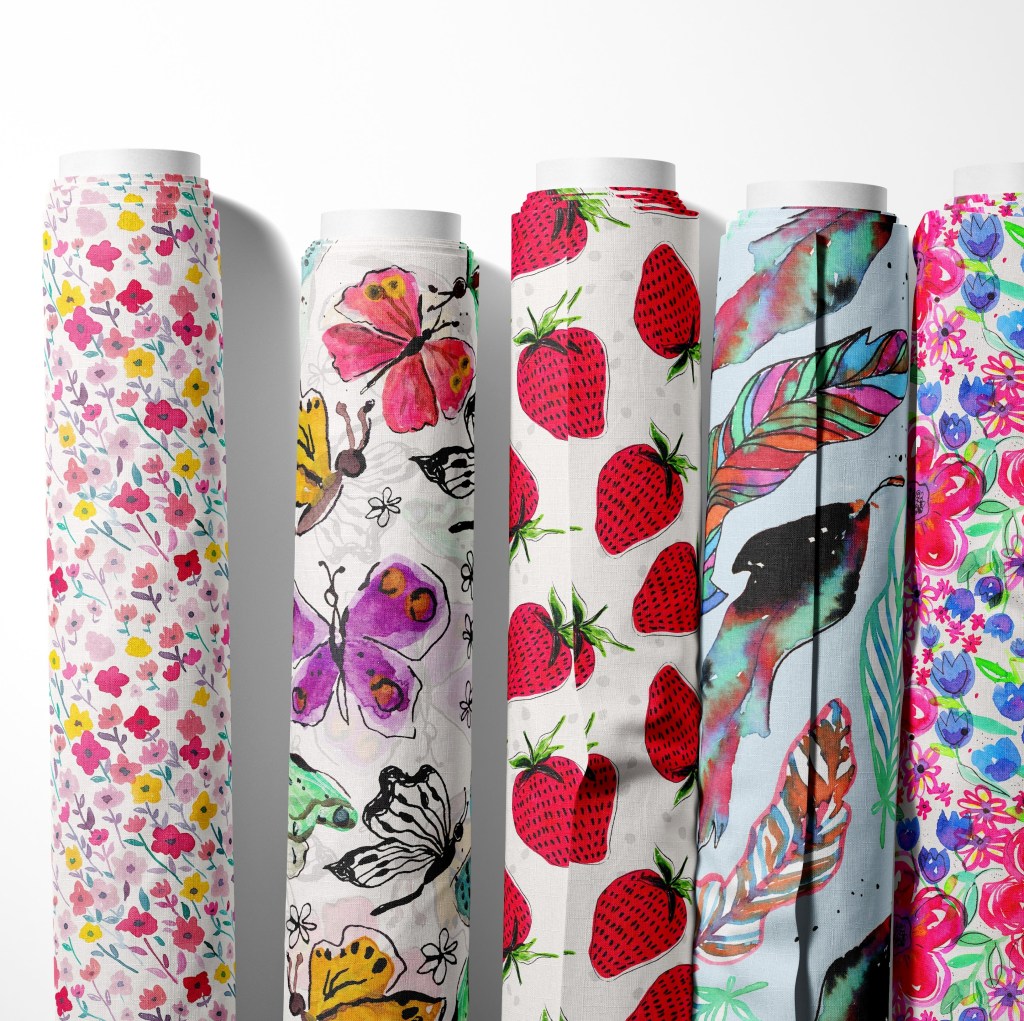
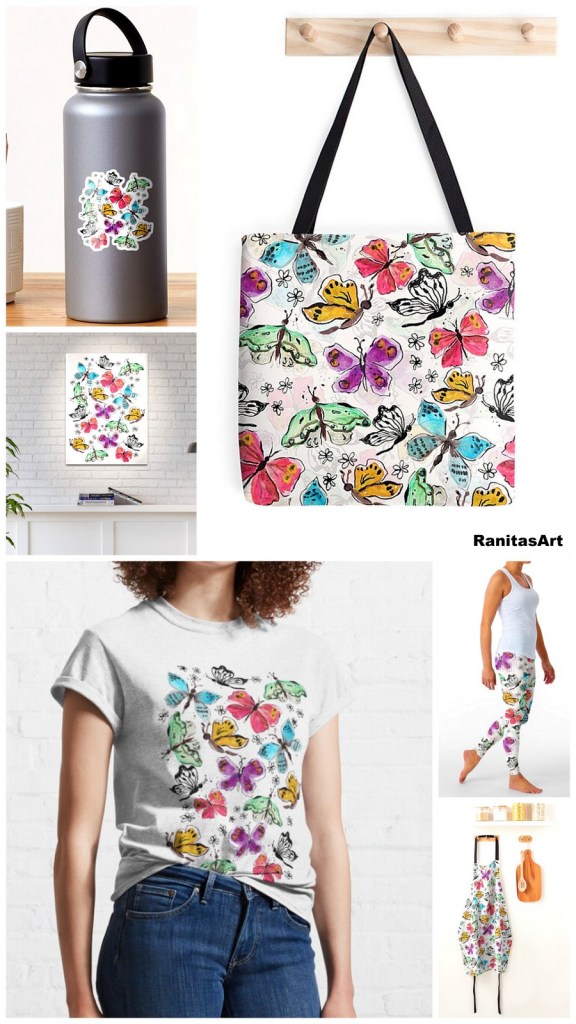
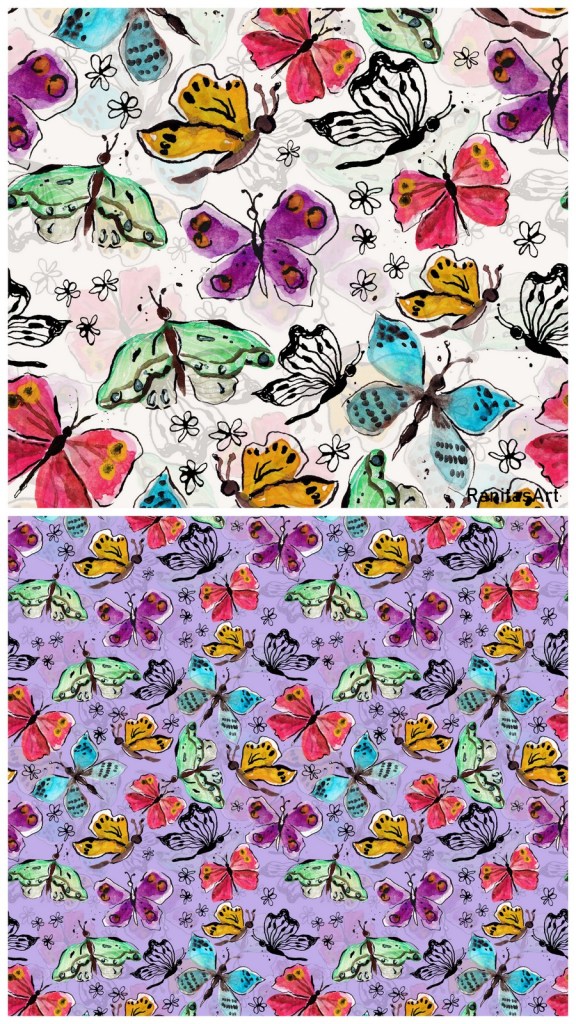
EN → Today I wanted to show you a set of butterflies that I drew with watercolors and ink. The colors of the watercolors and the ink were intermingled and a very organic effect was left. In the video you can see my work process. I also made a repeat pattern and a art print. I leave you the links so you can see how the butterflies turned out on different products.
ES → Hoy les quería mostrar un conjunto de mariposas que dibujé con acuarelas y tinta. Los colores de las acuarelas y la tinta se entremezclaron y quedó un efecto muy orgánico. En el video pueden ver mi proceso de trabajo. También realizé un patrón de repetición y una lamina de arte . Les dejo los links para que puedan ver como quedaron las mariposas sobre diferentes productos.
DE → Heute wollte ich euch eine Reihe von Schmetterlingen zeigen, die ich mit Wasserfarben und Tusche gezeichnet habe. Die Farben der Aquarelle und der Tusche vermischten sich und es blieb ein sehr organischer Effekt zurück. Im Video seht ihr meinen Arbeitsablauf. Ich habe auch ein Pattern Muster und einen Kunst Druck gemacht. Ich hinterlasse euch die Links, damit Ihr sehen könnt, wie sich die Schmetterlinge auf verschiedenen Produkten entwickelt haben.
EN → Above all, I really liked how the repeating pattern was printed on the fabric, I worked with two identical layers superimposed but in different directions and one of them almost transparent.
ES → sobre todo me gustó mucho como quedo impreso sobre tela el patrón de repetición, trabajé con dos capas iguales superpuestas pero en diferentes sentidos y una de ellas casi transparente.
DE → Vor allem hat mir sehr gut gefallen, wie das sich wiederholende Muster auf den Stoff gedruckt aussieht. Ich habe mit zwei identischen Schichten übereinander gearbeitet, aber in unterschiedlichen Richtungen und einer davon fast transparent.
EN → I wanted to show you this video I made some time ago. I recommend it to you because it is a nice creative inspiration for this summer. Very easy and quick to do. You will need paper for watercolors, pencil, eraser, water, brushes, watercolors, and masking fluid (which you can get from Amazon or art stores. Enjoy the video!
ES → Les queria mostrar este video, que hice ya hace un tiempo. Se los recomiendo porque es una linda inspiración creativa para este verano. Muy sencillo y rápido de realizar. Nesecitan papel para acuarelas, lapiz, goma, agua, pinceles, acuarelas y masking fluid ( que pueden conseguir en amazon o en alguna librería artistica. Disfruten del video !
DE → Ich wollte euch dieses Video zeigen, was ich vor einiger Zeit gemacht habe. Ich empfehle es euch, weil es eine schöne kreative Inspiration für diesen Sommer ist. Sehr einfach und schnell durchzuführen. Ihr benötigt Papier für Wasserfarben, Bleistift, Radiergummi, Wasser, Pinsel, Wasserfarben und Maskierungsflüssigkeit (die Ihr bei Amazon oder in Kunstläden bekommen könnt. Viel Spaß beim Video!
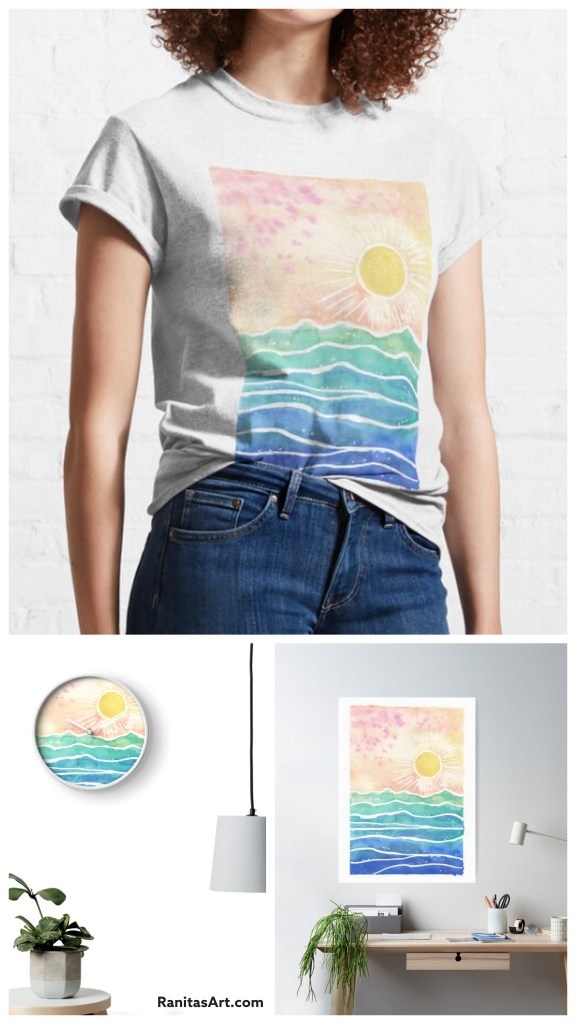
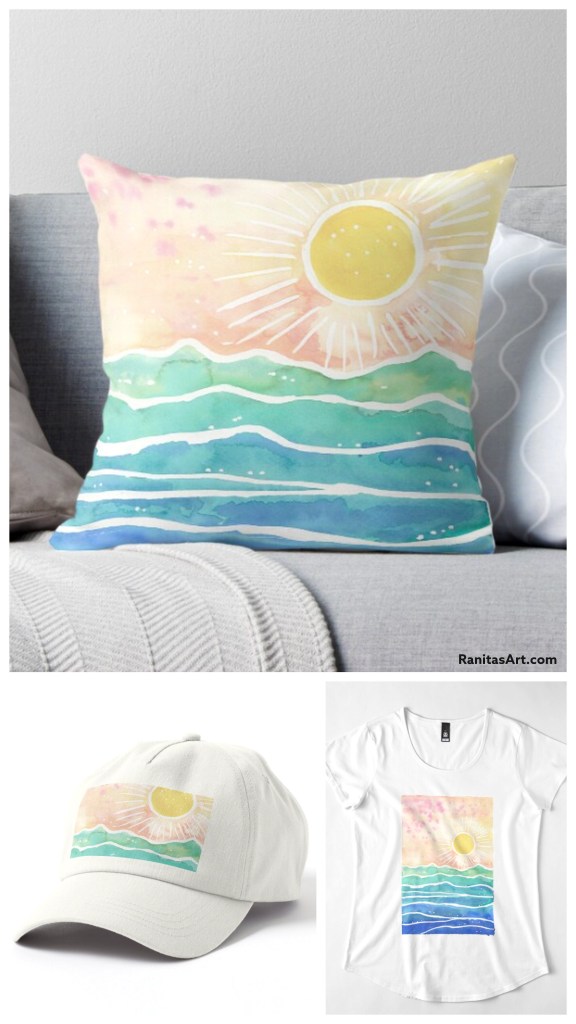
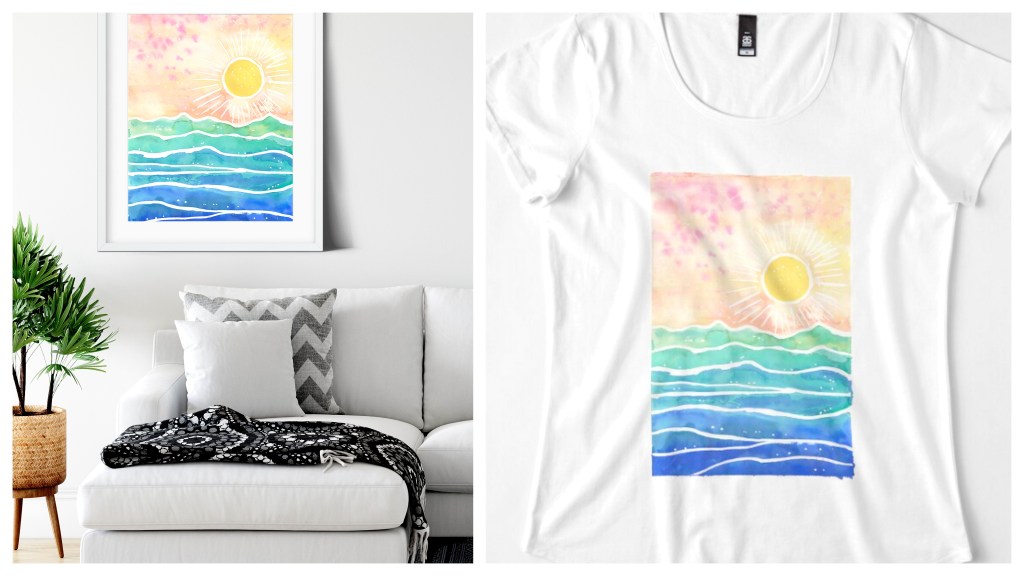
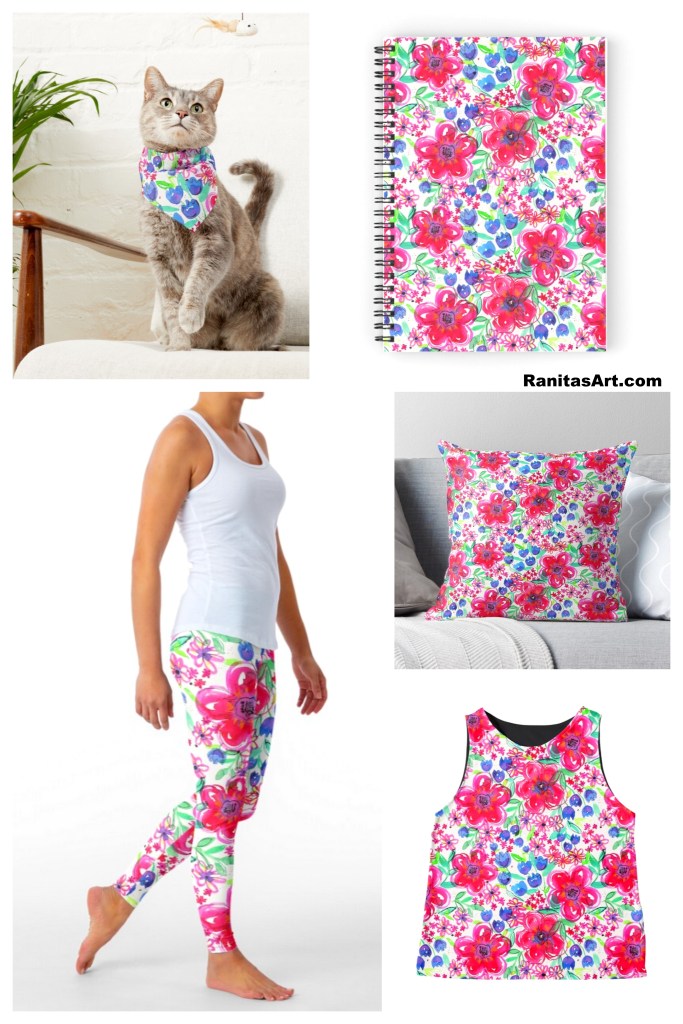
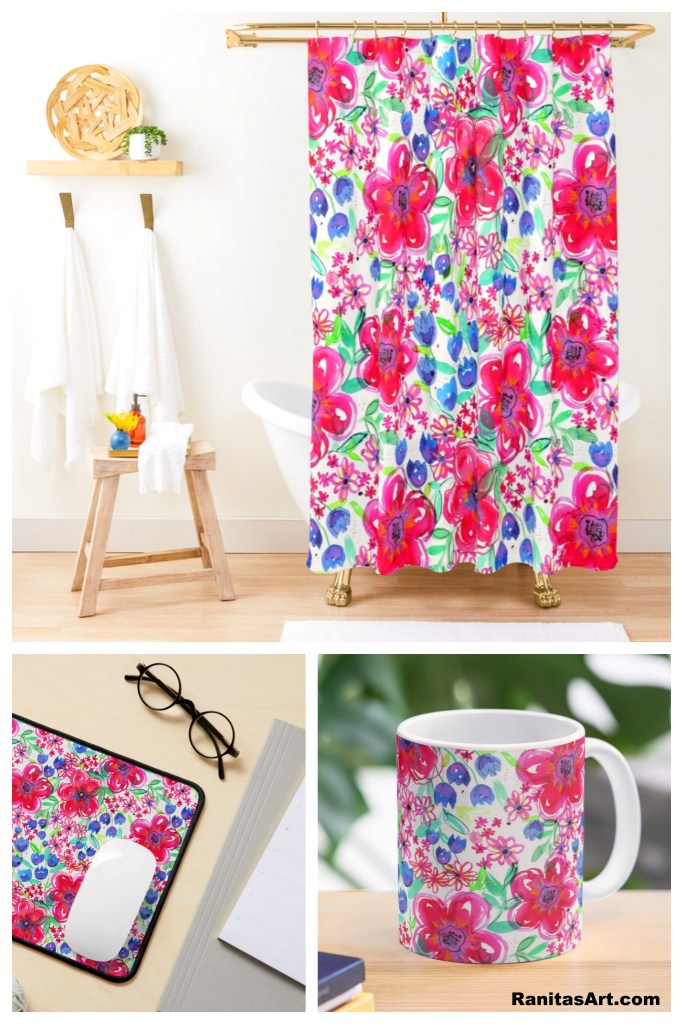
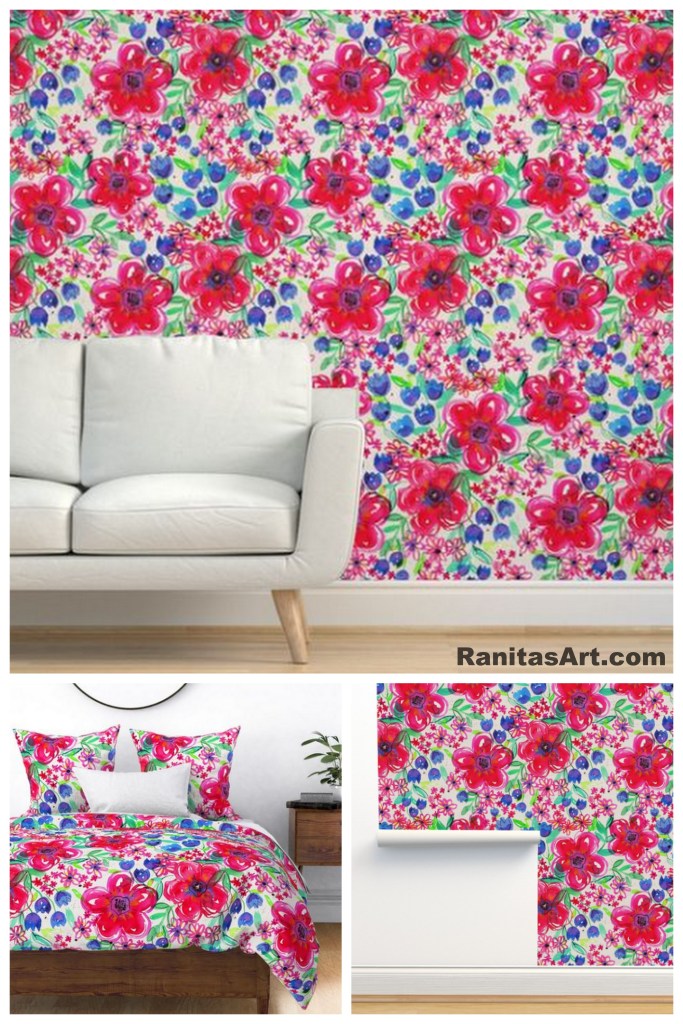
EN → Today I want to show you a floral design that I made some time ago. It is a very simple floral composition, with which I created a print and a repeating pattern. I did the 2 works with the help of Photoshop. In the case of the print, I added a circle on the back somewhat smaller than the design in a salmon color and a lighter salmon color on the background and some wavy lines. I leave you some links so you can see the design on different products.
ES → Hoy les quiero mostrar un diseño floral que hice ya hace un tiempo. Es una composición floral muy sencilla, con la cual cree una lamina y un patrón de repetición. Realicé los 2 trabajos con ayuda de Photoshop. En el caso de la lámina, agregué por detrás un circulo algo más pequeño que el diseño en un color salmón y de fondo un color salmón más claro y unas lineas onduladas. Les dejo algunos links para que puedan ver el diseño sobre diferentes productos.
DE → Heute möchte ich euch ein florales Design zeigen, das ich vor einiger Zeit gemacht habe. Es ist eine sehr einfache Blumenkomposition, mit der ich ein Print und ein sich wiederholendes Muster erstellt habe. Ich habe die 2 Arbeiten mit Hilfe von Photoshop gemacht. Bei dem Print habe ich auf der Rückseite einen etwas kleineren Kreis in Lachsfarbe und einen helleren Lachston auf dem Hintergrund und einige Wellenlinien hinzugefügt. Ich hinterlasse Ihnen einige Links, damit Sie das Design auf verschiedenen Produkten sehen können.
EN → In the video I show you my work process. It is one of my first videos that I uploaded to Youtube. I really like this video, even though sometimes the camera moves, because it’s a real-time video where you can see step by step how I paint some very simple flowers. Enjoy the video!
ES → En el video les muestro mi proceso de trabajo. Es uno de mis primeros video que subí a Youtube. Me gusta mucho este video, a pesar de que en algunos ocasiones se mueve la cámara, porque es un video en tiempo real donde pueden ver paso a paso como pinto unas flores muy sencillas. Disfruten del video !
DE → Im Video zeige ich euch meinen Arbeitsprozess. Es ist eines meiner ersten Videos, die ich auf Youtube hochgeladen habe. Ich mag dieses Video sehr, auch wenn sich die Kamera manchmal bewegt, weil es ein Echtzeitvideo ist, in dem Ihr Schritt für Schritt sehen könnt, wie ich einige sehr einfache Blumen male. Genieße das video!
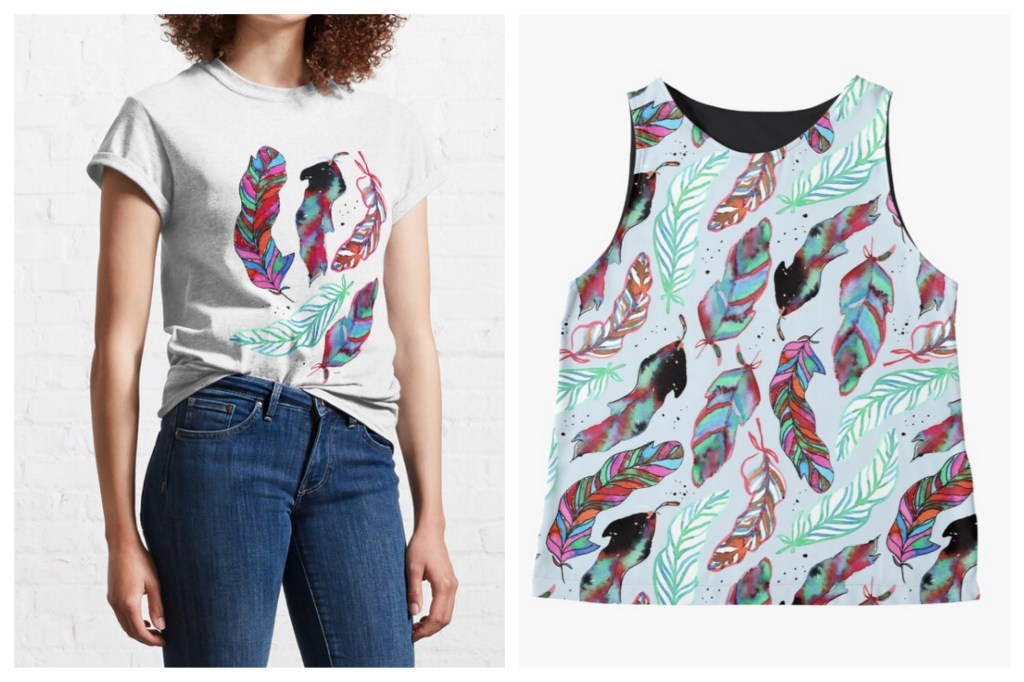
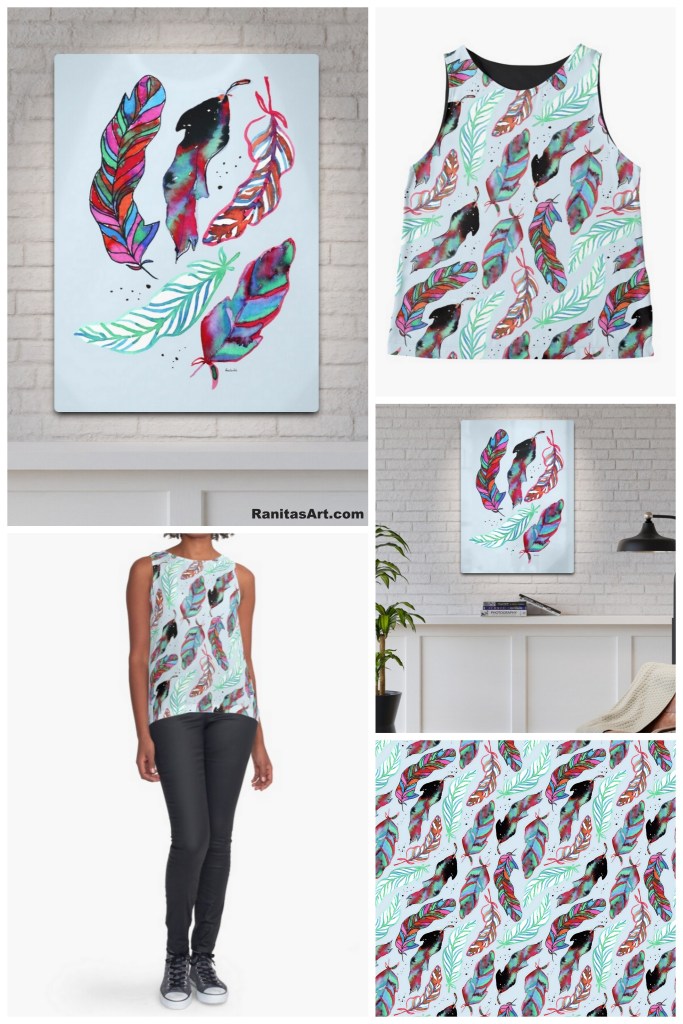
EN → In today’s post I want to show you a pattern that I made with a drawing of feathers that I painted with watercolors and black fineliner. I didn’t use all the feathers I painted, only the ones painted with watercolors. My work process to create the pattern was → paint the feathers, then scan the drawing, clean and cut the feathers with the help of Photoshop and create the pattern.
ES → En el post de hoy les quiero mostrar un patrón de repetición que realizé con un dibujo de plumas que pinté con acuarelas y microfibra negra. No utilicé todas las plumas que pinté, solo las pintadas con acuarelas. Mi proceso de trabajo para crear el patrón fue → pintar las plumas, luego escanear el dibujo, limpiar y recortar las plumas con ayuda de Photoshop y crear el patrón.
DE → Im heutigen Beitrag möchte ich euch ein Wiederholungsmuster zeigen, das ich mit einer Federzeichnung gemacht habe, die ich mit Wasserfarben und schwarzer Fineliner gemalt habe. Ich habe nicht alle Federn verwendet, die ich gemalt habe, sondern nur die mit Wasserfarben gemalten. Mein Arbeitsablauf zur Erstellung des Musters war → Federn malen, dann Zeichnung scannen, Federn mit Hilfe von Photoshop säubern und zuschneiden und das Muster erstellen.
EN → In the video I show you how I painted the feathers and I leave you some photos and links so you can see how the pattern looks on different products.
ES → En el video les muestro como pinté las plumas y les dejo algunas fotos y links para que puedan ver como queda el patrón sobre diferentes productos.
DE → In dem Video zeige ich euch, wie ich die Federn gemalt habe, und hinterlasse euch einige Fotos und Links, damit Ihr sehen könnt, wie das Muster auf verschiedenen Produkten aussieht.
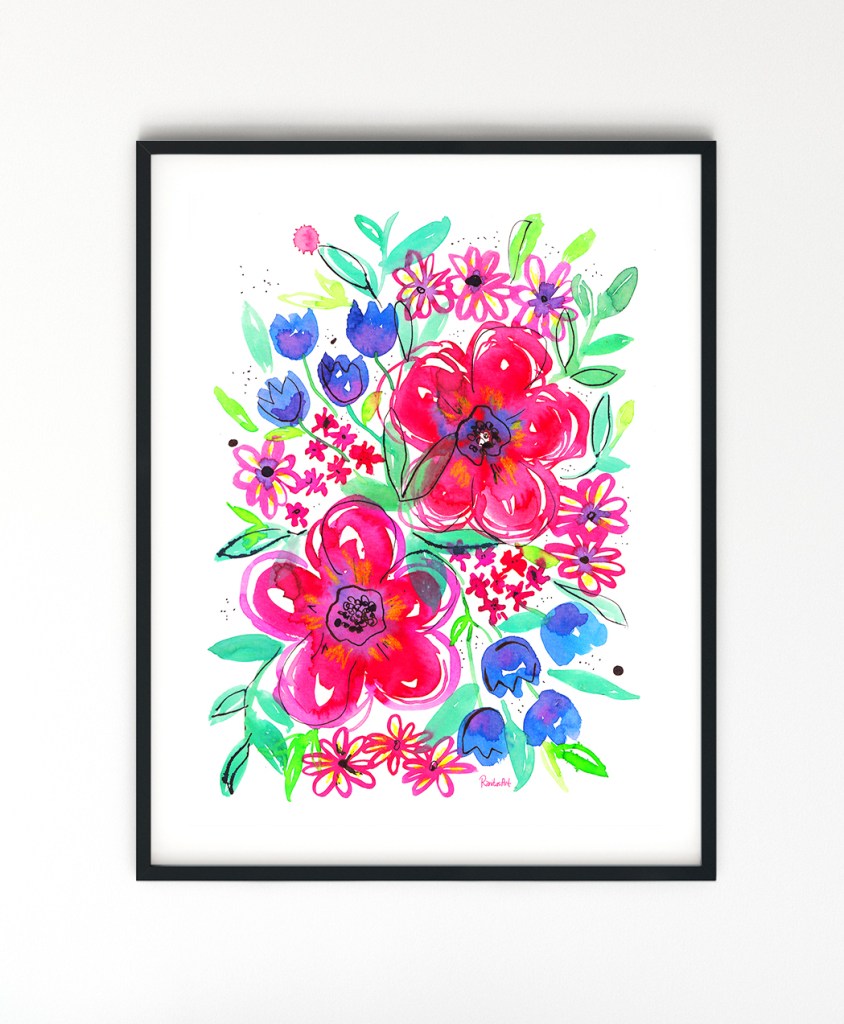
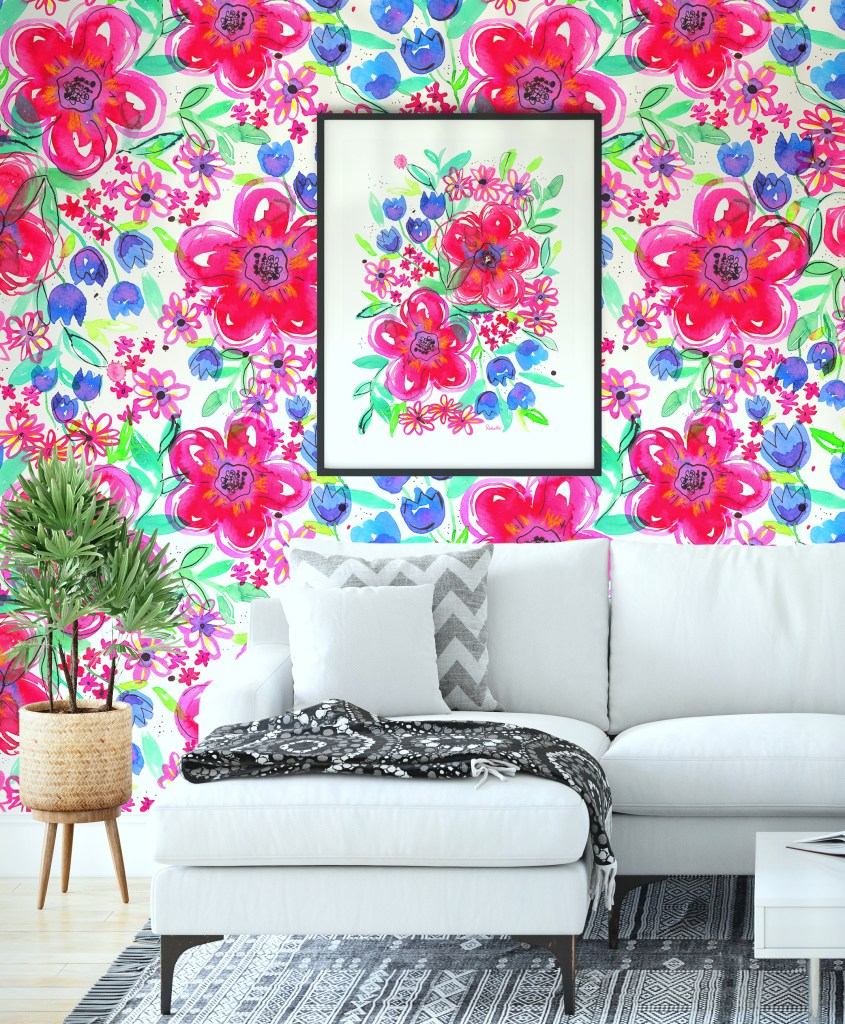
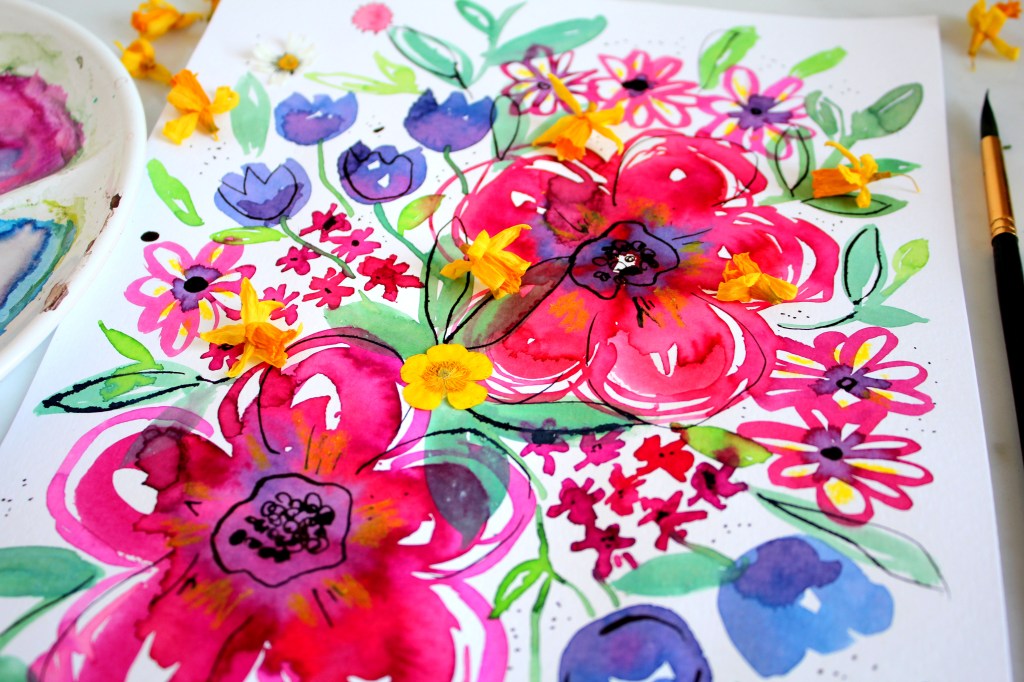
EN → In today’s post I want to show you a floral composition that I painted with watercolors and ink. I painted two large central flowers and smaller flowers on the sides trying to achieve a balance between the different sizes. I made a print and a repeat pattern with the help of photoshop. In the video you can see my work process. I leave you some photos with their links so you can see how the drawing looks on different products.
ES → En el post de hoy les quiero mostrar una composición floral que pinté con acuarelas y tinta. Pinté dos flores grandes centrales y flores más pequeñas en los costados tratando de lograr un balance entre los diferentes tamaños. Realicé una lámina y un patrón de repetición con ayuda de photoshop. En el video pueden ver mi proceso de trabajo. Les dejo algunas fotos con sus links para que puedan ver como queda el dibujo sobre diferentes productos.
DE → Im heutigen Beitrag möchte ich euch eine Blumenkomposition zeigen, die ich mit Wasserfarben und Tusche gemalt habe. Ich habe zwei große Blumen in der Mitte und kleinere Blumen an den Seiten gemalt, um ein Gleichgewicht zwischen den verschiedenen Größen zu erreichen. Ich habe mit Hilfe von Photoshop ein Print und ein Wiederholungsmuster erstellt. Im Video könnt Ihr meinen Arbeitsprozess sehen. Ich hinterlasse euch einige Fotos mit Links, damit Ihr sehen könnt, wie die Illustration auf verschiedenen Produkten aussieht.
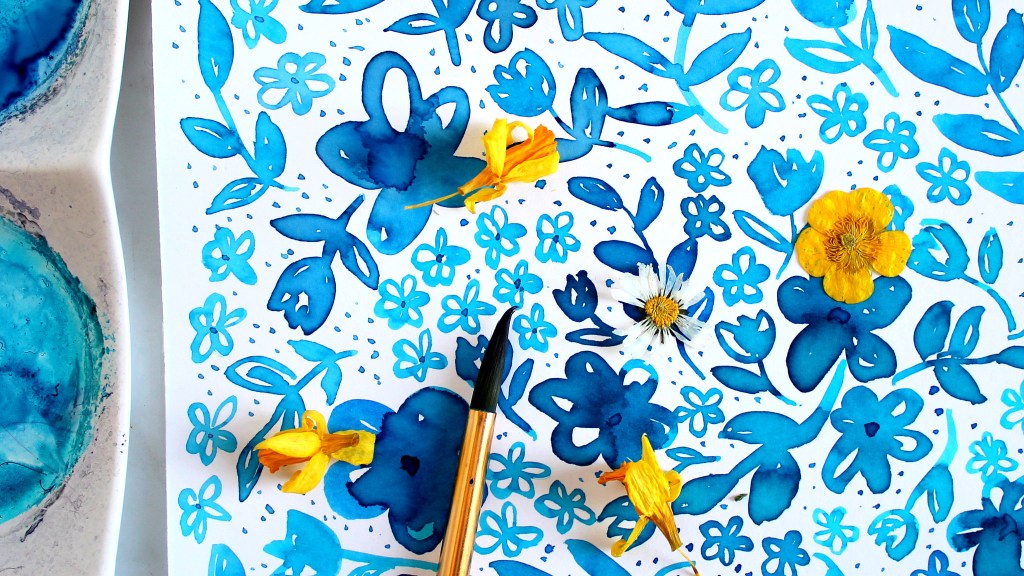
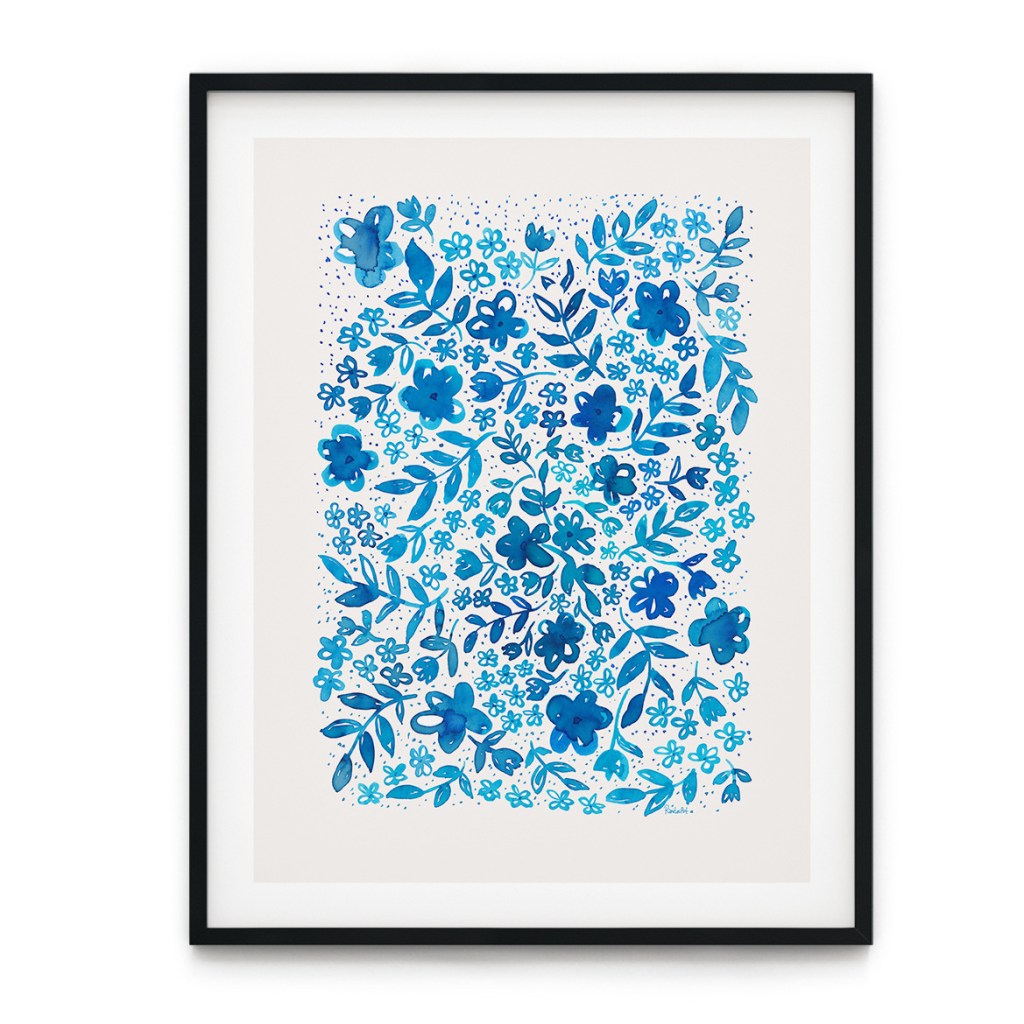
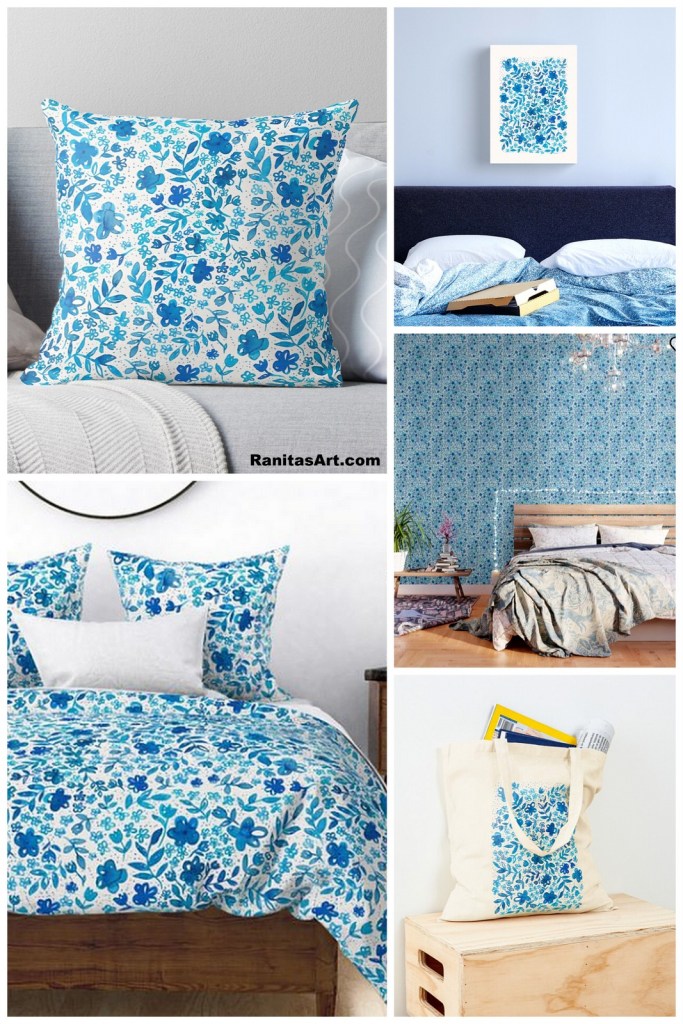
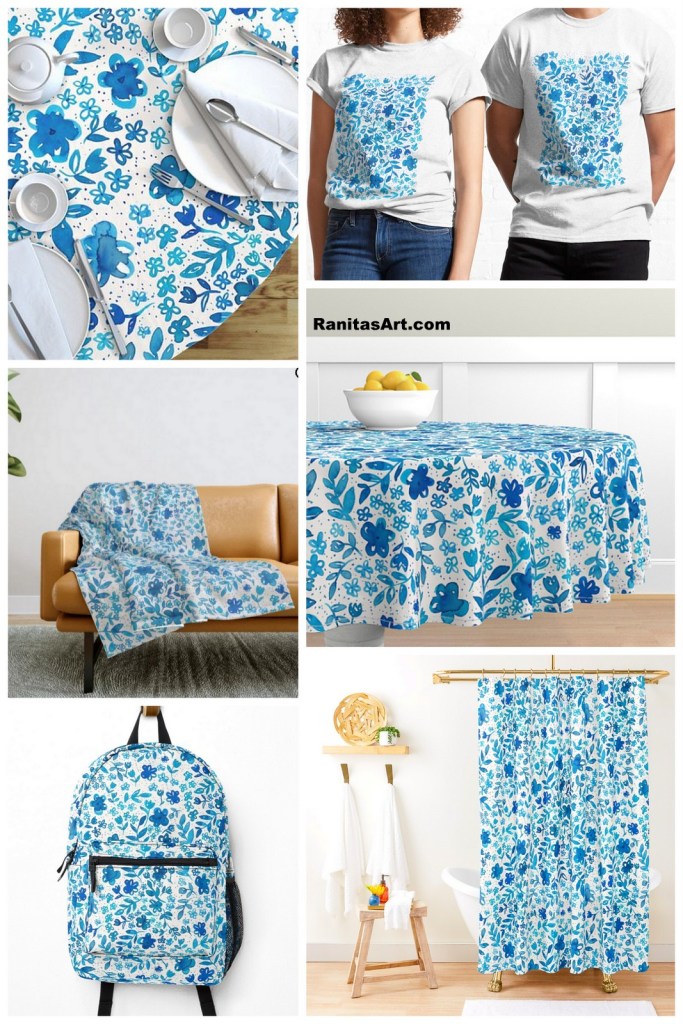
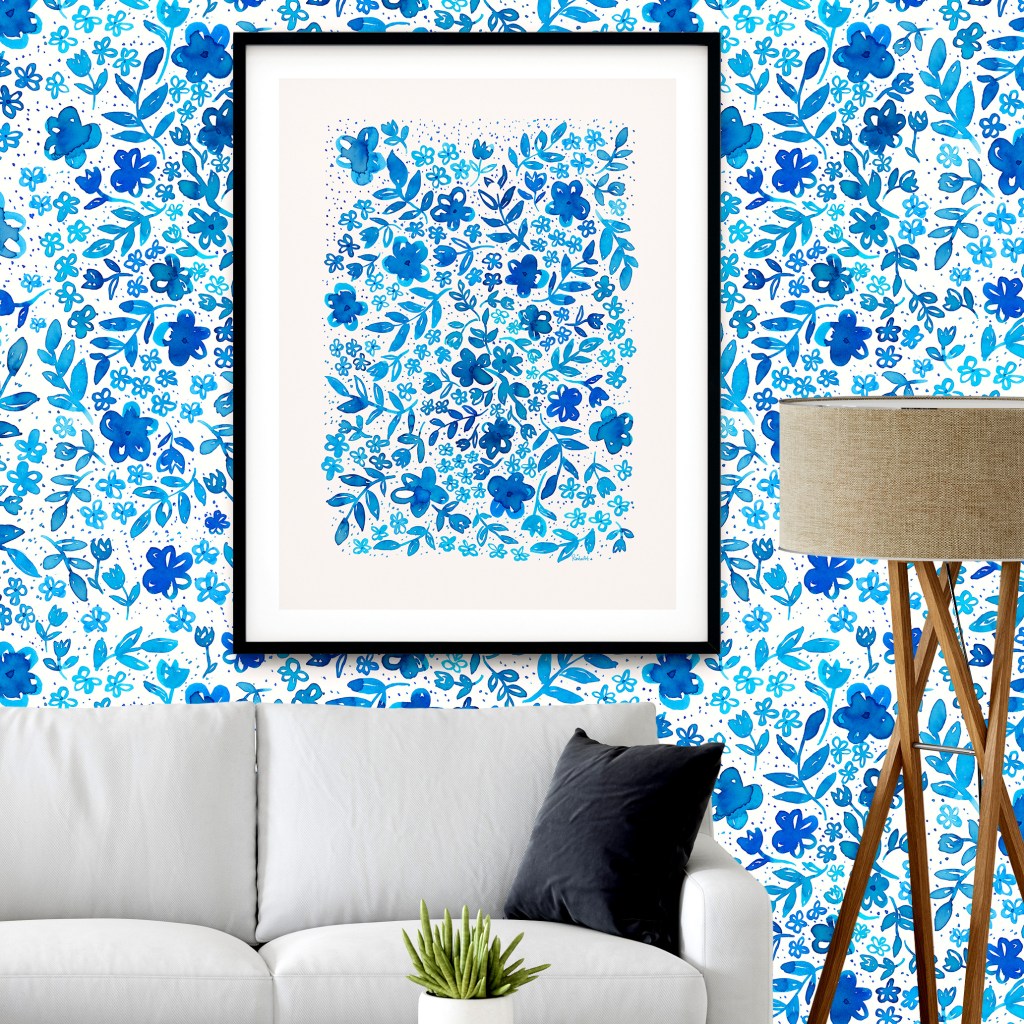
EN → Today I want to show you this beautiful floral pattern in indigo blue that I painted with watercolors. I worked without a previous sketch and used only one color. In the video I show you my work process. Then with the help of Photoshop I created a repeating pattern and a sheet where you can see the complete drawing in the center. I leave you some photos and links so you can see the pattern on different surfaces.
ES → Hoy les quiero mostrar este hermoso patrón floral en azul indigo que pinté con acuarelas. Trabajé sin boceto previo y utilizé solo un color. En el video les muestro mi proceso de trabajo. Luego con ayuda de Photoshop creé un patrón de repetición y una lámina donde se puede ver el dibujo completo en el centro. Les dejo algunas fotos y links para que puedan ver el patrón sobre diferentes superficies.
DE → Heute möchte ich euch dieses schöne Blumenmuster in Indigoblau zeigen, das ich mit Wasserfarben gemalt habe. Ich habe ohne vorherige Skizze gearbeitet und nur eine Farbe verwendet. Im Video zeige ich euch meinen Arbeitsprozess. Dann habe ich mit Hilfe von Photoshop ein sich wiederholendes Muster und ein Blatt erstellt, auf dem Sie die vollständige Zeichnung in der Mitte sehen können. Ich hinterlasse Ihnen einige Fotos und Links, damit Sie das Muster auf verschiedenen Oberflächen sehen können.